TubeBuddy, my new best friend

TubeBuddy Logo

I’ve been editing and posting quite a few videos for clients lately and I was looking for a tool to assist me with tags, keywords, etc.

I recently discovered TubeBuddy.

TubeBuddy is a FREE browser extension that integrates directly into YouTube to help you run your channel with ease.

I currently use the free version but it gives me access to everything I need. For pricing details visit the TubeBuddy site.

Here’s what the free version includes:

  • Upload Checklist– You don’t always remember everything you need to do during the upload process
    • Write a Compelling Title
    • Enter a Complete Description
    • Add Descriptive Tags
    • Create Custom Thumbnail
    • Add Info Cards
    • Add to Playlist(s)
    • Share on Social Media
  • Quick-Edit Toolbar–Easily navigate between videos when editing a list
    • There is no way to easily edit videos in a Playlist on YouTube without it
    • You are tired of having to click the My Videos page every time you want to edit another video
    • You like to be able to easily jump between videos
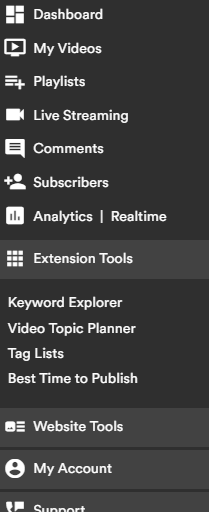
Quick dashboard
  • Quick Links Menu–Easily navigate to common areas on YouTube without having to click 17 times
    • YouTube makes you click 47 times and load 13 pages to simply get to your My Videos page (note: we maybe have exaggerated slightly)
    • There are only a few areas that you go to all the time and you should be able to get to them more easily
    • Coming soon: Customize the Quick Menu with your own links
  • Notification Commenting–Reply to comments directly from the YouTube notification window
    • You want to comment on videos directly from the YouTube notification window
    • You don’t want to leave the current page you are on to make a comment
    • You are frustrated that YouTube removed this basic functionality
  • Emoji Picker–Add Emojis to your Titles, Tags and Descriptions
    • You want to make your Titles stand out in a crowd
    • You want to tag your videos in unique ways to help in related videos section
    • You don’t want to have to visit an external site to use emojis
  • Advanced Video Embed–Create embed codes with the full list of options for adding videos or playlists to your website
    • YouTube only gives you a few basic options for embedding videos and playlists
    • You want to customize the look of your embedded video or playlist
    • You don’t want to have to go to the video watch page to get the embed code for your own video

There are 3 upgrades from the free version.

  1. PRO at $9/mo
  2. STAR at $19/mo
  3. LEGEND at $49/mo

For more information on what is included with each upgrade, click here.

Below is a complete list of tools included with the free version
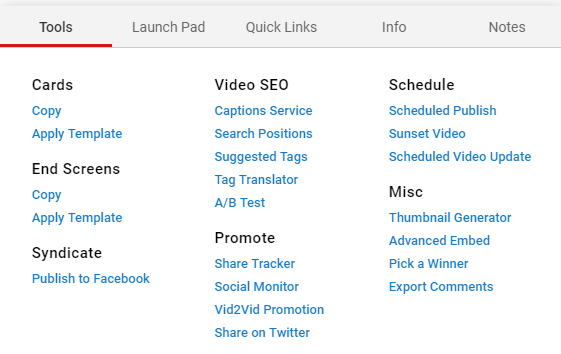
List of tools from TubeBuddy

I use the suggested tags all the time. I recommend the YouTube video tool for those that are working at getting more traffic to their YouTube channel.

For a free consultation call, you can contact me at 619-623-1036 or email me at chris@serenityva.com

Gutenberg: The New WordPress Editor

Much to my dismay, WordPress updated their editor to the new Gutenberg. I had recently posted a new blog post about creativity tools and low and behold, there was the new editor!

I took a look around and thought, how hard can it be? Well, my blog post looked like crap when I was done and it took me some time just to figure out how to add images and to align them correctly. So, I just posted it as is and thought I’ll come back to it later.

Today is later….I’ve done just a little digging around and I have found a Gutenberg tutorial that gives you step-by-step instructions on how to use the new editor. It’s free and easy to follow. Lots of pictures too!

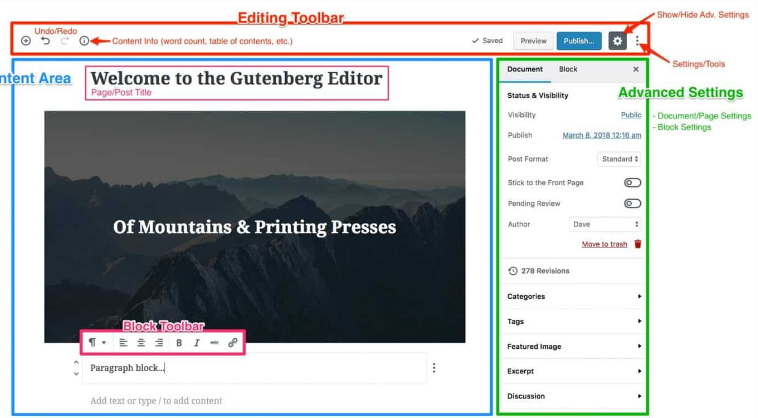
Editing Toolbar

Located at the very top of the screen, the editing toolbar allows you to do the following:

  • Add a new block to the content area
  • Undo/Redo changes you’ve made
  • View your content’s structure (number of words, paragraphs, blocks, headings, and a table of contents)
  • Save your changes, or see a visual confirmation that your latest changes have been auto-saved
  • Preview your page/post
  • Publish settings, such as post visibility & publish date/time
  • Show/Hide the advanced settings right sidebar
  • Additional settings, including:
    • Switch between visual & code editors
    • Fix the block toolbar to the top of the screen (more on this below)
    • Copy all content

Content Area

The content area is where you add content to your page. This is essentially the same as it was in the classic WordPress editing screen. Only now, instead of using TinyMCE to edit content, you’re using Gutenberg blocks.

Block Toolbar

The block toolbar is the smaller toolbar that appears just above each individual block. The block toolbar shows up when you click inside of a block to edit it.

Advanced Settings

The advanced settings area is located in the right sidebar, and comprised of two distinct sub-sections:

  • Document Settings
  • Block Settings

Document Settings (aka: Page Settings)

I like to think of these as page (or post) settings. They are the settings that apply to that one specific page or post that you are editing.

Document settings contains much of the same information that was in the right sidebar of the classic WordPress editor:

  • Status, visibility & publish date
  • Post format
  • Categories
  • Tags
  • Featured image

It also includes some things that you were used to seeing below your content (at the bottom of the page):

  • Author
  • Discussion settings
  • Excerpt

Block Settings

This is where you’ll find advanced settings for each individual block on your page.

The block toolbar, directly above the block itself (in the content area), contains the most commonly used, and most basic, settings. However, many blocks have even more options, and those can be configured here in the right sidebar.

Explore all Gutenberg blocks and learn how to use each one.

I was familiar with using blocks to a certain extent as I have a client with a Squarespace interface.

Are you having diffuculties in learning the new Gutenberg interface? Follow the tutorial or email me at chris@serenityva.com and I’ll help you.

4 Tools to Use Daily For Your Business

Tool I use daily for my business

On a daily basis I need to accomplish many tasks with a minimum of effort and time. I maintain many websites and social media accounts along with formatting newsletters and ezines.

The 4 tools I’m listing I use on a daily basis for formatting and social media maintenance.

Hootsuite
Hootsuite is a program that I have been using for quite some time. It allows me to manage all my client’s social media accounts. There are free and upgraded service plans. In a previous blog post, I discussed the difference between Hootsuite and Sprout Social. Hootsuite is a social media management platform, created by Ryan Holmes in 2008. The system’s user interface takes the form of a dashboard and supports social network integrations for Twitter, Facebook, Instagram, LinkedIn, Google+ and YouTube.

Canva
I use Canva daily to create social media graphics for all of my client’s social media marketing. I use the free account. You can see some of my graphics here.
Canva is a graphic-design tool website, founded in 2012. It uses a drag-and-drop format and provides access to over a million photographs, graphics, and fonts. It is used by non-designers as well as professionals. The tools can be used for both web and print media design and graphics.

Pexels
I use Pexels all the time. I find the most beautiful images there. I find images for my client’s ezines and other social media imagery.
Pexels provides high quality and completely free stock photos licensed under the Pexels license. All photos are nicely tagged, searchable and also easy to discover through our discover pages.

Remove Background
This is a new app that I just started using. I’ve been playing around with it to test its usage. What I have found is that it needs to be about to identify a “real” person in it. I’ve tried with cartoon figures and it does not work. Remove.bg is a free service to remove the background of any photo. It works 100% automatically: You don’t have to manually select the background/foreground layers to separate them – just select your image and instantly download the result image with the background removed!

These are just a few tools that I use for creativity and social media marketing. There are many more and of course, new ones are popping up almost daily. What tools do you use or would you recommend? Leave a comment below for your recommendations.

Need help with your social media marketing? Contact me at chris@serenityva.com for a free consultation.

Create a Media Library in Squarespace Following These Easy Steps

If you’ve been using WordPress as your website platform and you now have a client that uses Squarespace, it can be daunting if you don’t know your way around.
Squarespace doesn’t provide a media library the way WordPress does. WordPress makes it so easy to upload images and insert them into newsletters or widgets. So, I learned how to create a media library in Squarespace and you can create one too by following these simple steps.

  1. Open your admin bar on the left and go to Home >> Pages
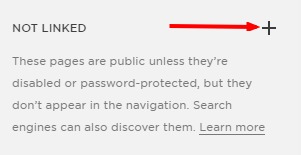
  2. Find the ‘Not linked’ section.
  3. Click on the plus symbol to create a new page.

Now, you can add files to that folder!

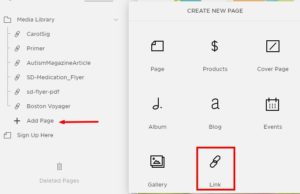
  1. Click on the ‘+ Add Page’ link under your library folder.
  2. Choose ‘Link’.


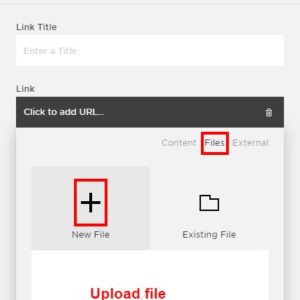
In the window that pops up, if you haven’t already, name your file or image, and click to add your URL (don’t be mislead, we’re going to add your file or image AND create a unique URL for that). Choose ‘Files’ >> ‘New File’, then ‘Add a file’ – upload your image or file, and ‘Save’.


You’ve added your first image to your media folder. To find the link for the image, it will look something like this: www.website.com/s/filename.extension (.jpg, .png).

In addition to adding images, you can also upload files, such as pdf’s.


Fake Followers-Don’t Buy Them!

geralt / Pixabay

I recently read a post written by Mark Schaefer of {grow}. He states that there is a real case for buying fake followers?

Why? Because it works.

It’s all about “social proof” which is an important element in today’s marketing strategies. If you don’t have a huge following on the various social media sites, where is your social proof?

Whether we like it or not, we need social proof. Online and off. We assume that if someone has a lot of followers, they are more knowledgeable, popular or huge influencers in their field of expertise. We follow the herd…

A few years ago, a client was vetting a photographer on Instagram. They were looking for a comped stay at an exclusive resort in Fiji. They stated because of their huge following on Instagram, the potential for more publicity for the resort was almost guaranteed as a result of their influence. The client asked me to look into their various social media profiles with an emphasis on Instagram. Well, I took a look at their profile on Instagram, and indeed they did have over 50,000 followers. They had not posted a single post, but they had 50, 000 followers. How can that be? They purchased them, that’s how.

Needless to say, we did not comp them any time at the resort…people, it’s not rocket science. The numbers talk!

Let’s just say that it just takes time to make headway in the social media marketing world. To become an influencer in any market, you need to work at it. In this age of instant gratification, time is of the essence. Take your time, it’s worth it in the end.

Need help with your social media marketing? Contact me at chris@serenityva.com for a free consultation.


How To Become A Virtual Assistant

I was recently part of a poll of 15 other active VA’s on how to become a virtual assistant. Some of the questions were very enlightening and really gave me pause for thought.

Here are just a few of those questions:

  1. What does it mean to be a virtual assistant?
    To me it means flexibility. I consider this a full-time, work-from-home job. One which I love, but it offers me the flexibility to do what I love. I take my job very seriously. This is not a “do it when I want a job.” I have many clients whom I am responsible to. I have schedules and time constraints to be respectful of. So, if you’re not willing to be respectful of yourself or your clients, this may not be the job for you.
  2. Who makes a good virtual assistant?
    There is a wide range of folks that can make good virtual assistants! You just need to find your niche and go with it. Communication is key though. If you are not a good communicator and like to be a hermit, perhaps web design or coding is more up your alley. Again, you need to be respectful of your client’s schedules.
  3. What services can you offer as a virtual assistant?
    There are many different types of VAs. When I started out, social media was MySpace, that was it. Facebook was still a glimmer in Mark Zuckerberg eye. 
    Services can range from email management, scheduling/calendar management, and bookkeeping to customer service, website management, social media services, and writing newsletters.
  4. What do virtual assistants find frustrating about their work?
    Balance….trying to find the right balance between work and life. Turning it off when I am. There have been many times when I’ve laid awake at night trying to figure out a problem. Quite honestly, I’ve gotten the answer many times that way! 
  5. What advice do virtual assistants have for others looking to enter the business?
    Do not become a doormat! Respect yourself and what you offer. Do not undervalue yourself. If a prospective client does not see that value in what you do, then it’s probably not a good match. Do not be afraid to make mistakes. Own them, learn from them and move on.

I love being a virtual assistant. There are always times when I want to pull my hair out, but thus far, this has been the best job I’ve ever had. I love being self-employed. Now, that doesn’t mean I don’t answer to anyone, I have to answer to my clients.

To read the entire article, please visit Mama Saves Fish on How to Become a Virtual Assistant.

Need help with your social media marketing? Contact me at chris@serenityva.com for a free consultation.

This post may contain affiliate links. If you click & make a purchase, I receive a small commission at no cost to you!

Facebook News Feed Updates

Facebook recently launched Facebook Journalism to collaborate with the news industry. They also released News Feed Publisher Guidelines…

The News Feed Publisher Guidelines are designed to provide an overview of News Feed: how it works, the values it operates by, the policies Facebook enforces, the signals we look for when ranking stories, and the storytelling tools Facebook offers to help your content reach the right audience.

They have created a set of News Feed Publisher Principles — three basic, high-level guideposts to keep in mind when sharing content to News Feed. These principles are:

  1. People on Facebook value meaningful, informative stories = Publishers should ideally focus on what they do best; making the important and meaningful stories interesting to their audience.
  2. People on Facebook value accurate, authentic content- Publishers should focus on posting accurate, authentic content.
  3. People on Facebook value standards for safe, respectful behavior- Publishers should follow the Community Standards. Check the page for the latest updates and additions.

Every time you open Facebook, News Feed goes through a set of four steps to answer the question: Which stories are likely to matter most to your readers?

News Feed is an algorithm — meaning, it’s a formula or set of steps for solving a problem. These are the four essential steps of the News Feed algorithm:

  1. Inventory- What stories have been posted by friends and publishers?
  2. Signals – Who posted this story?
  3. Predictions- How likely are you to comment on this story?
  4. Score- Relevancy Score- We use all of the consolidated signals to develop a relevancy score — a number that represents how interested we think users will be in that story.

This new initiative enables the publishing professional to better target likely readers for engagement with you.

Need help with your social media marketing? Contact me at chris@serenityva.com for a free consultation.

Hootsuite or Sprout Social? What is the Solution?

Whether you are an established business or just starting, it is imperative that in your business plan a section on Social Media Marketing is included. 

From a design perspective, Sprout Social is much easier to look at and use. Hootsuite favors function over form. Hootsuite has the edge in reporting, though Sprout Social offers more extras, like social CRM and audience discovery.

In the end, it depends what you’re looking for. Both solutions are excellent tools for managing your social media, but the difference lies in which capabilities are most important to your organization.

Hootsuite lets users build adjacent feeds across a single dashboard and customize the type of information that each feed displays. That means you can set up a feed for each of your social accounts and create more specific filters on each of those accounts — e.g. posts from Facebook or incoming tweets.

Sprout Social instead aggregates posts into a single feed. You can customize the information in the feed by checking and unchecking filters, and you can also move to a network-specific view (for example, everything from LinkedIn) with one click.
Social media management tools are your best friends when it comes to integrating social media into your marketing strategy.

They can help you manage multiple profiles, track specific keywords, as well as allow you to schedule your posts in advance so you don’t have to spend hours every day coming up with content and logging into various accounts just to post updates.

The following table is taken from a recent post.

Features

Hootsuite

Sprout Social

Free Plan

Yes

No, but offers 30-day free trial

Pricing

From $8.99/month billed annually

From $59/user/month

Social Media Platforms

Facebook (profile, page, group), Twitter, LinkedIn (profile, group, company), Google+ (pages only), extra profiles via third-party apps

Facebook (pages), Twitter, LinkedIn (profile, company), Google+ (pages only), Instagram

Analytics

Posts, follower’s growth, engagement, and traffic; basic analytics are free, advanced analytics are a paid feature

Audience growth and analysis, post engagements, trends, social media listening

Collaboration

Yes on paid plans

Yes

Publishing

Yes and you can add an RSS feed even on the free plan

Yes

Scheduling

Yes, unlimited

Yes, unlimited

Extra Features

Very customizable dashboard, bulk upload of messages on paid plans, custom shortener, multiple images in posts, content suggestions, and custom time settings

Publish send time optimization, social CRM, unified inbox, bit.ly integration

Hootsuite:
Price: Free, $8.99/month for Pro Version; Business and Enterprise plans depend on the number of users.

Primary Focus: Manage all your social networks in one spot with a customizable dashboard that lets you see several feeds at once.

Sprout Social:
Price: Deluxe plan for $59/user/month; $99/user/month for Premium Plan; $500/month with three users for the Team plan.

Primary Focus: An all in one social media management tool that lets you schedule, publish, analyze, and engage with your audience.

Choosing the right platform to use has so many variables. Each platform has it pros and cons. Do your research. Try out the free or trial plans.

If you need to plan your social media strategy and align it with your business goals better, then contact us and we’ll put together the right option for you.

Gramblr-Sends Your Pictures From Your Computer to Instagram

As a virtual assistant, I love it when I find new tools that make my job so much more efficient and I’ve discovered that tool.

It’s called Gramblr and I found it through an article posted on Social Media Examiner.

It’s as easy as it sounds.

In the past, I’ve used Hootsuite to post to Instagram, but I still had to send them from my phone. I would schedule them in Hootsuite and then I would get a notification on my phone from Hootsuite, have to open the file then post to Instagram.

No more. All I had to do is download the desktop application and I was all set to go. I did have to enter my username and password for Instagram and enter my handle for Twitter.

How It Works

To open on Mac OS X, right click (or CMD+click) and select open, click open in the message box.

Once you have Gramblr’s photo uploader (version 1), you just:

  1. Sign in to Instagram
  2. Choose the photo you would like to upload
  3. Add a caption
  4. Hit upload
  5. If the text boxes are empty on the confirmation window, something went wrong… try again and it should work!

It’s really that easy! I love this new application and I’ll be using it with all of my clients as well. 

Any new tools and tricks you would like to share? Just post them in the comments section below.