Much to my dismay, WordPress updated their editor to the new Gutenberg. I had recently posted a new blog post about creativity tools and low and behold, there was the new editor!
I took a look around and thought, how hard can it be? Well, my blog post looked like crap when I was done and it took me some time just to figure out how to add images and to align them correctly. So, I just posted it as is and thought I’ll come back to it later.
Today is later….I’ve done just a little digging around and I have found a Gutenberg tutorial that gives you step-by-step instructions on how to use the new editor. It’s free and easy to follow. Lots of pictures too!
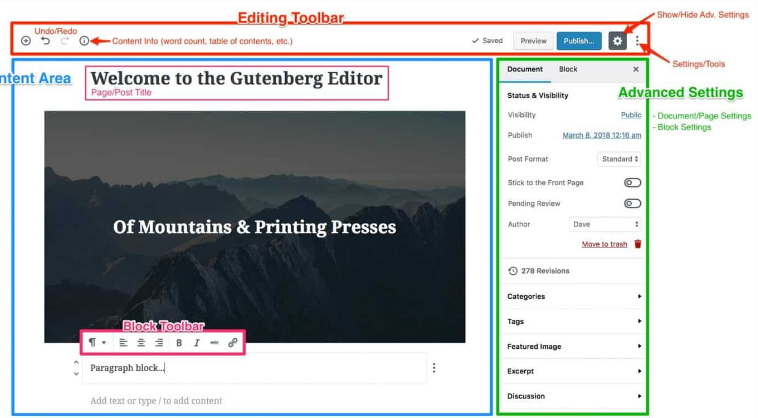
Editing Toolbar
Located at the very top of the screen, the editing toolbar allows you to do the following:
- Add a new block to the content area
- Undo/Redo changes you’ve made
- View your content’s structure (number of words, paragraphs, blocks, headings, and a table of contents)
- Save your changes, or see a visual confirmation that your latest changes have been auto-saved
- Preview your page/post
- Publish settings, such as post visibility & publish date/time
- Show/Hide the advanced settings right sidebar
- Additional settings, including:
- Switch between visual & code editors
- Fix the block toolbar to the top of the screen (more on this below)
- Copy all content
Content Area
The content area is where you add content to your page. This is essentially the same as it was in the classic WordPress editing screen. Only now, instead of using TinyMCE to edit content, you’re using Gutenberg blocks.
Block Toolbar
The block toolbar is the smaller toolbar that appears just above each individual block. The block toolbar shows up when you click inside of a block to edit it.
Advanced Settings
The advanced settings area is located in the right sidebar, and comprised of two distinct sub-sections:
- Document Settings
- Block Settings
Document Settings (aka: Page Settings)
I like to think of these as page (or post) settings. They are the settings that apply to that one specific page or post that you are editing.
Document settings contains much of the same information that was in the right sidebar of the classic WordPress editor:
- Status, visibility & publish date
- Post format
- Categories
- Tags
- Featured image
It also includes some things that you were used to seeing below your content (at the bottom of the page):
- Author
- Discussion settings
- Excerpt
Block Settings
This is where you’ll find advanced settings for each individual block on your page.
The block toolbar, directly above the block itself (in the content area), contains the most commonly used, and most basic, settings. However, many blocks have even more options, and those can be configured here in the right sidebar.
Explore all Gutenberg blocks and learn how to use each one.

I was familiar with using blocks to a certain extent as I have a client with a Squarespace interface.
Are you having

