 If you’ve been using WordPress as your website platform and you now have a client that uses Squarespace, it can be daunting if you don’t know your way around.
Squarespace doesn’t provide a media library the way WordPress does. WordPress makes it so easy to upload images and insert them into newsletters or widgets. So, I learned how to create a media library in Squarespace and you can create one too by following these simple steps.
- Open your admin bar on the left and go to Home >> Pages
- Find the ‘Not linked’ section.

- Click on the plus symbol to create a new page.
Now, you can add files to that folder!
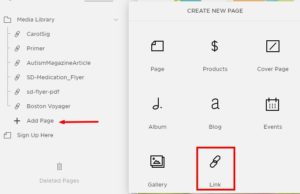
- Click on the ‘+ Add Page’ link under your library folder.
- Choose ‘Link’.

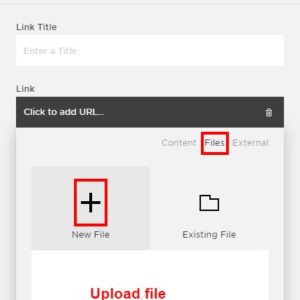
In the window that pops up, if you haven’t already, name your file or image, and click to add your URL (don’t be mislead, we’re going to add your file or image AND create a unique URL for that). Choose ‘Files’ >> ‘New File’, then ‘Add a file’ – upload your image or file, and ‘Save’.

You’ve added your first image to your media folder. To find the link for the image, it will look something like this: www.website.com/s/filename.extension (.jpg, .png).
In addition to adding images, you can also upload files, such as pdf’s.
